Unlock the power of short-form video
Intuitive tools to create repeatable, on-brand, compliant video that breaks through.

Ways to put CreatorSuite to work
Employee stories
Bring a day in the life of a teammate to life
Brand ambassadors
Turn employee voices into brand stories.
Executive social
Elevate executives as social thought leaders.
Employee advocacy
Empower employees to advocate.
Sales outreach
Enable sales to connect with impact.
Product insights
Showcase products through customer perspectives.
Short explainers
Transform complex ideas into clear explainers.
Culture content
Highlight culture with authenticity.
Give your teams the tools to create snackable video faster
Recording Booth
Easy, self-guided recording with a built-in teleprompter for desktop or mobile. Files are never stored locally, keeping content secure.
Editor
Rapid, template-based editing tools that anyone can use. With a simple drag-and-drop interface, it’s easy to add subtitles, graphics, and branding.
And everything else you need to create short-form video at scale
Connect and publish to your existing enterprise applications
Seamlessly publish across social, hosting, work, storage, and LMS platforms to streamline workflows, support easy reviews, and meet compliance standards.
Scale video creation with speed ⚡ and control 🔒
Editing for everyone
If you can use a Word document, you can edit videos in CreatorSuite. Templates, subtitles, and graphics make every video polished and compliant.
Simple recording
So simple, you can get more people recording in a consistent, repeatable way. Every session is auto-saved to your content library in the highest quality.
Project management
Spaces, permissions, and shared assets give people exactly what they need — nothing more, nothing less.
Recent CreatorSuite news
Key takeaways:
- Successful advisors win businesses by building trust
- Scalable, repeatable client growth systems help leaders prioritize the right channels
- Boutique and massive firms alike use snackable video to drive organic growth
The market shift is already happening
Wealth management is entering a new era. Those who aren’t adopting new strategies and focusing on organic growth risk being left behind.
- $124T in wealth transfer is coming
- 81% of next-gen investors plan to switch firms quickly
- Changes primarily driven by Millennial and Gen Z
This means that advisors, massive firms alike, need to be nimble and ready to fight to win new business and keep existing clients.
Social media and digital touchpoints are vital to reach both prospects and existing clients. This isn’t a trend that may happen in the future, it’s already happening.
- 45% of current investors get advice online
- 24% of investors use social media for financial insights
Those numbers show that investors are already exploring information, forming opinions, and making decisions on who they should invest with through these channels.
Trust is now built before the first meeting.
Advisors are struggling to scale
Savvy advisors and leadership across the financial industry know the above numbers — those insights might not be revelatory. There’s already a plan in place for which content performs best across those social and digital platforms.
Industry leaders know short-form video content drives success.
Advisors and leaders in the space already know:
- Video builds trust
- Social builds visibility
- AI can expand reach
But creating that type of content at scale, particularly across a massive organization, becomes an operational challenge.
Execution breaks down, and firms fail to leverage snackable video because there’s:
- No time
- No repeatable system
- No consistent output
Without a systematic approach to video creation and turning it into organic growth, there’s no way firms can see the benefits they inherently know come from making more video content.
The Shift: one-off video projects to a scalable growth system
Growth doesn’t come from one great video. It doesn’t even necessarily come from creating a bunch of content en masse.
Organic growth comes from a system that makes video creation:
- Repeatable
- Efficient
- Scalable
- Integrated
Video for the sake of video doesn’t move the needle. It has to be a part of a growth engine tailored to the needs of the firm.
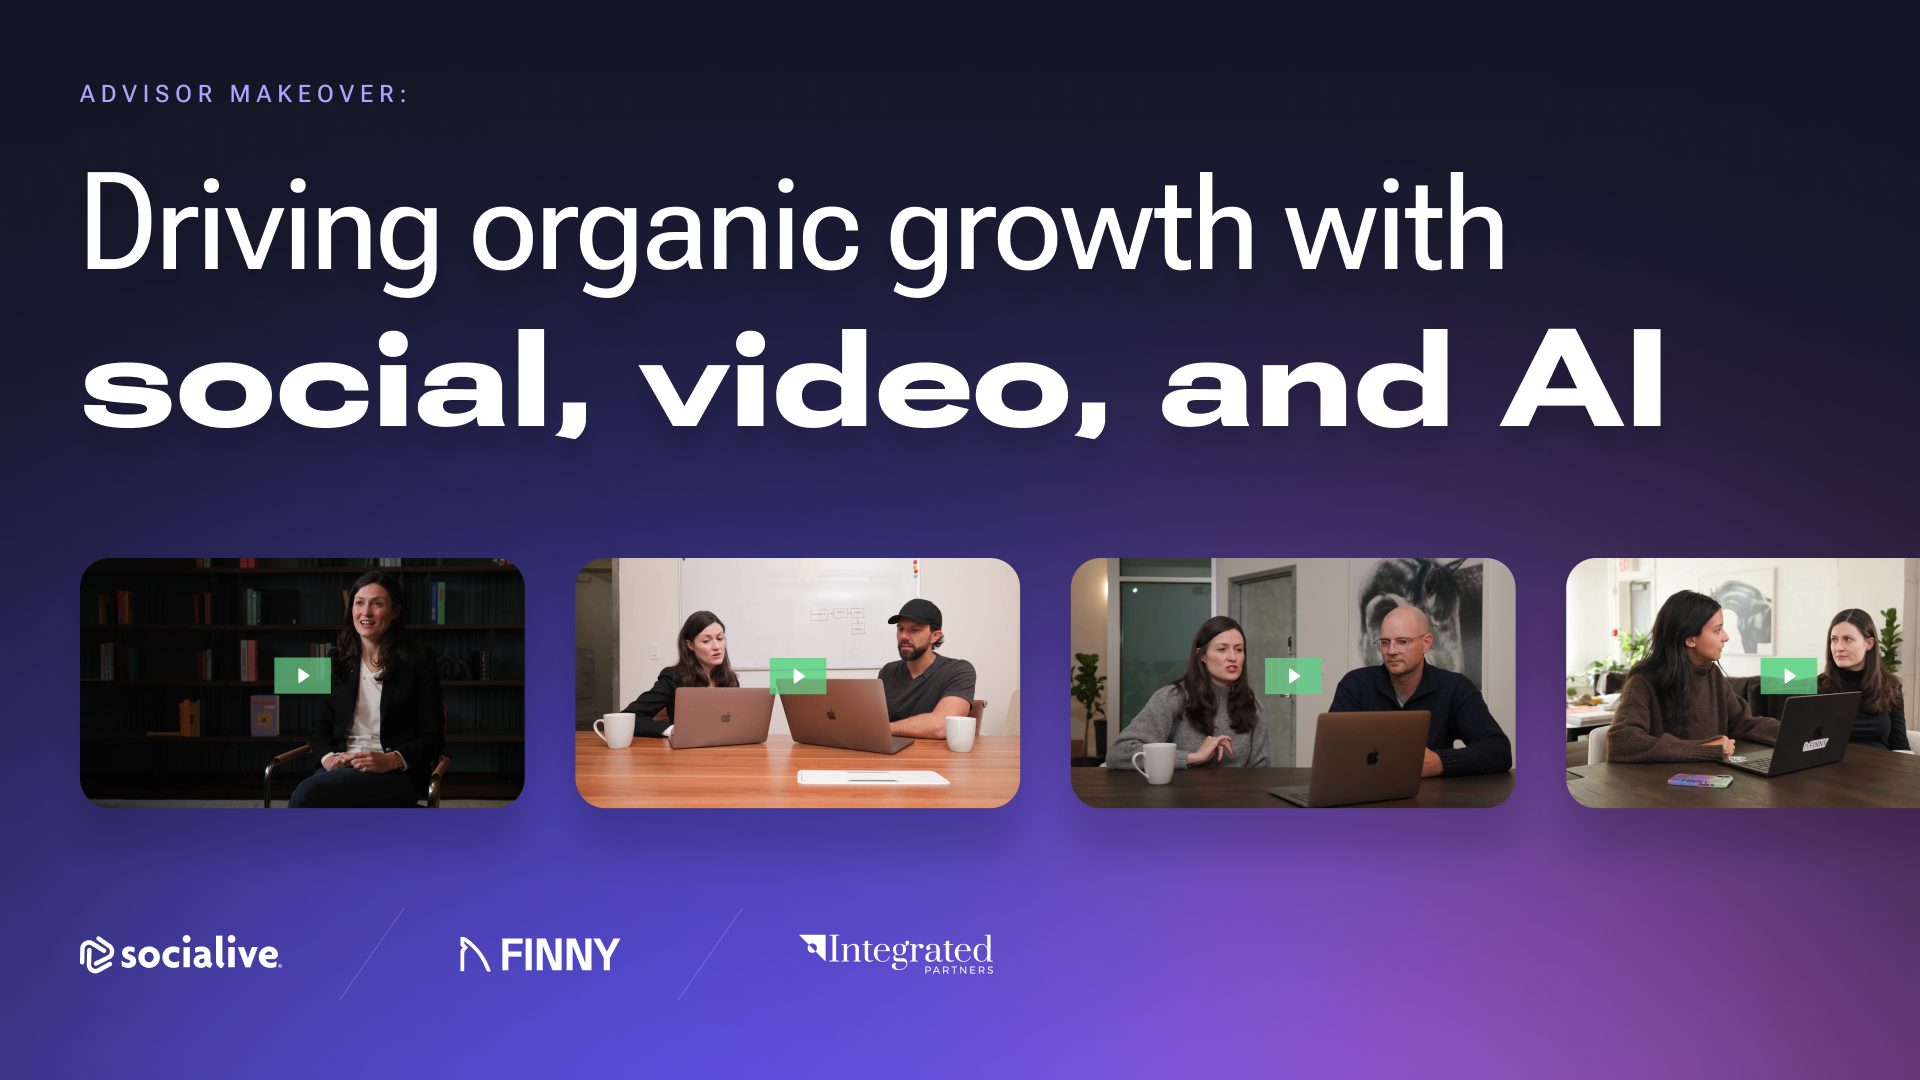
That’s exactly what we built the Advisor Makeover video series to show.
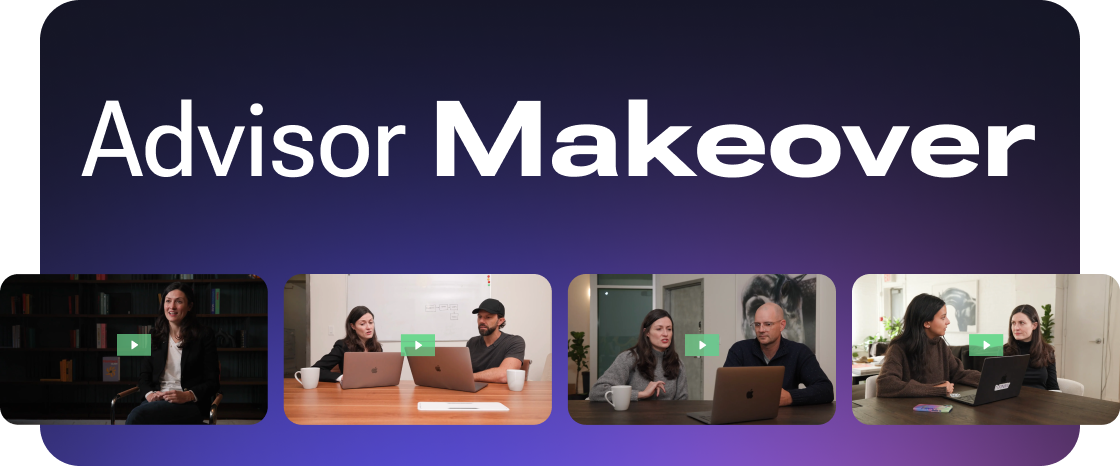
The four-part series follows Ann Hynek, founding partner and CEO at Hestia Wealth and Wellness, as she works with industry experts to attract the right clients and grow her practice.
- Ann builds an organic growth engine with the aim of hitting $100m AUM in year one of operations
- Ann takes ownership of her content strategy by leveraging her personal story, learning how to write scripts and create video confidently
- Ann uses tools and develops insights on how to leverage AI to target “right fit” prospects
Her journey highlights the type of streamlined operation that helps advisors, asset managers, and similar roles targeting investors put together a program to build organic growth.
What Ann learns in the series can be applied as a template for any firm.
Episode 1: Define your growth strategy
Ann has a broadcasting background and built a career in marketing across financial services — from BlackRock and Morgan Stanley to local firms. But now, as an owner-operator, Ann doesn’t have the bandwidth to take on ad hoc projects to meet her growth goals.
Ann needed a repeatable growth engine.
In episode one of the series, Ann highlights how to develop:
- Clarity on your growth goals
- A defined ideal client profile (ICP)
- A clear starting point for content
Start with strategy, not random content.
Episode 2: Build a message that connects
Episode two highlights Ann’s first step to growing her business — refining her messaging. Ann knows who she is, who she serves, and what she wants new clients to know about her. She just needed a bit of help refining her story for social media storytelling.
Introduce Mike Schwartze, principal of Mike Schwartze Consulting, to help Ann tell her story on camera.
In episode two, Ann comes into her own building:
- Simple, repeatable script frameworks
- Clear positioning that resonates
- Confidence in what to say on video
Most advisors don’t struggle with expertise — they just need help with the messaging.
Episode 3: Create video without friction in Socialive
Episode three gets into how she can quickly craft high-quality video content at scale in an end-to-end workflow. Ann logs into Socialive for the first time and gets oriented in the platform with the help of Socialive's director of product marketing, Jason Krute.
Ann needed a tool to meet her needs, and Socialive delivered.
In episode three, Ann explores how Socialive provides:
- A simple way to record consistently with a built-in teleprompter
- AI that enables you to fix eye contact and audio automatically
- A workflow that includes a pre-approved brand template, script
- An AI-powered editor that enables text-based editing to remove ums and ahs
- Built-in integrations for permission-based publishing
Socialive makes video creation actually scalable with “80%” of the work already done.
Episode 4: Scale and target with AI in Finny
Ann knew all too well that it takes time to build an audience in her niche. In episode four, she takes the next step to growth: targeting. Spray and pray is no way to build a growth engine.
FINNY CEO and Co-founder Eden Ovadia shows Ann how to use AI-powered targeting to identify and connect with right-fit prospective clients.
In episode 4, Ann uses FINNY and learns the best way to:
- Identify and target the right prospects
- Find industry-related content to send as a value add
This is where FINNY helps advisors reach the right audience at the right time.
How advisors and firms are winning today
- Authenticity, not necessarily polish, performs the best in content
- Consistency and flexibility speed time to market and scale reach
- Video is an integral part of outreach and communication strategies
- Reaching the right audience can be done in an efficient, targeted way
See how it all comes together
Ann’s organic growth plan came together in our Advisor Makeover series — now see where she is today.
Join us live on Thursday, April 23, at 12 p.m. ET for the Advisor Makeover webinar featuring:
- Ann Hynek, Founder, CEO, and Principal Advisor of Hestia Wealth and Wellness
- Jason Krute, Director of Product Marketing at Socialive
- Eric Phillips, Head of Enterprise Sales at FINNY
- Mike Schwartze, Principal, Mike Schwartze Consulting
- Hosted by Matt Ackermann of Integrated Partners
In the 30-minute session, you’ll learn:
- How to build a repeatable video system
- How to scale content without increasing effort
- How to combine Socialive + AI targeting for real growth
- What’s actually working for advisors today
Most advisors don’t fail because they lack ideas. They fail because they lack a system.
From March 8–11 in Miami Beach, Socialive is joining FINNY and Integrated Partners at Future Proof Citywide to launch a hands-on Advisor Video Bootcamp experience designed specifically for financial advisors.
The goal is simple: give advisors a practical, guided way to experience how short-form video and AI-powered prospecting can work together to modernize outreach.
Hosted at the FINNY booth, the Advisor Video Bootcamp is built as a live, on-the-ground activation where advisors don’t just hear about video — they create it.
What is the advisor video bootcamp?
The Advisor Video Bootcamp is a structured, 15-minute recording session where advisors create a polished, 60-second professional introduction video — their personal advisor story, like the below example from Ann Hynek from Hestia Wealth and Wellness.
During each session, advisors:
- Clarify who they serve and their niche focus
- Articulate why they became an advisor
- Highlight their expertise and experience
- Record a professional-quality introduction video
- Leave with a finished asset ready to use immediately
Using Socialive’s browser-based platform, advisors are guided step-by-step through a coach-led experience that includes:
- Light, structured coaching
- A built-in teleprompter
- AI-powered eye-contact correction
- Studio-quality audio enhancement
- Automated finishing touches
No production crew. No editing software. No friction. Just a clear process that results in a usable prospecting asset.
Why video matters for modern advisors
Today’s advisor prospect expects personalization, clarity, and authenticity. Traditional cold outreach often gets ignored. Static profiles blend in.
But a short, well-crafted video allows prospects to see and hear the person behind the credentials. It builds trust faster and creates a stronger first impression.
Each Advisor Video Bootcamp recording focuses on what prospects care about most:
- Why you chose this profession
- Who you serve best
- Your niche expertise
- The value you bring to client relationships
Every video closes with a simple, human invitation to connect — making it versatile across:
- LinkedIn profiles
- LinkedIn prospecting messages
- Email outreach
- Follow-up after meetings
It becomes a reusable asset that fits naturally into modern advisor workflows.
How the experience comes together
This activation brings together complementary strengths:
Socialive powers the AI-driven video creation experience, enabling compliant, polished video in minutes.
FINNY brings intelligent, high-intent prospect targeting — continuously analyzing financial life events and niche alignment to help advisors connect with the right prospects at the right time.
Integrated Partners contributes deep advisor enablement expertise and a content-first approach to growth.
Together at Future Proof Citywide, the Advisor Video Bootcamp demonstrates how authentic storytelling and intelligent targeting can elevate advisor outreach.
What to expect at the FINNY booth
Advisors can pre-book a 15-minute recording session, with a limited number of walk-up slots available during the event.
Each participant leaves with a professionally enhanced video delivered digitally and ready for immediate use.
Space is limited, and advance registration is encouraged.
We’re excited to bring this experience to Future Proof Citywide and to help advisors see what’s possible when AI, video, and intelligent prospecting come together.
If you’re attending in Miami, sign up, stop by the FINNY booth, and record your advisor story.
New enterprise snackable video creation solution unlocks the ability to quickly source, guide, and create video of employees, executives, and experts with speed, control, and compliance for company-wide impact.
LOS ANGELES — August 6th, 2025 — Socialive, the AI-powered enterprise video creation platform, today announced the launch of CreatorSuite, the enterprise-ready toolbox for scaling short-form video across large-scale organizations.
Purpose-built to meet the surging demand for snackable, people-powered video, CreatorSuite empowers both video and non-video professionals to source, guide, and create compliant content from employees, executives, and subject-matter experts — faster than ever. With self-guided recording tools, brand-safe templates, and automated approval workflows, teams can now deliver high-quality, on-message video — without production bottlenecks or risk.
“Short-form video powers today's online world, infusing reach, trust, and action — and now enterprise organizations have a reliable way to harness the power of snackable video,” said David Moricca, CEO and Founder of Socialive. “CreatorSuite removes the bottlenecks associated with resource-heavy video production. With templates, guided recordings, text-based editing, and compliance sitting at the foundation of it all, any functional area across a modern business can now turn its most important messaging into polished, on-brand, compliant video in minutes.”
Purpose-Built for Enterprise-Grade Scale, Speed, and Control
CreatorSuite addresses the top barriers to short-form video creation at scale: the difficulty of collecting content from busy, camera-shy executives and SMEs, the manual effort required to edit, maintain brand consistency, and the risk of publishing off-message or non-compliant assets.
- Recording Booth offers a professional, self-guided environment that employees can access on their own schedules.
- Smart invitations, prompts, and an on-screen teleprompter remove guesswork so contributors know exactly what to say and how to say it.
- Projects keep large video initiatives organized, while recording invites ensure each recording lands in the right spot for fast, easy text-based editing.
- Pre-approved templates and brand overlays lock in pre-approved messaging, brand logos, colors, intros, and outros automatically, which are ready for rinse and repeat.
- Automated captions and role-based approvals let teams polish and complete videos in minutes — not weeks — while meeting brand, legal, and regional compliance requirements.
Proven Business Impact
Early adopters report up to a 10× increase in short-form video output and a 75% reduction in production turn time. By turning executives, field sellers, and employees into content contributors, organizations see broader reach, deeper engagement, and measurable growth in pipeline and employee engagement without expanding headcount.
Coming Later This Year: AISuite
AISuite, launching later in 2025, is Socialive’s new AI engine for unlocking more value from every video. Fully integrated with CreatorSuite for short-form video and ProducerSuite for long-form productions, AISuite enhances quality, surfaces key insights, amplifies reach, and streamlines workflows, helping enterprises deliver more high-quality, on-brand video at scale.
AISuite unlocks four key advantages
- Enhance: Make every recording look and sound flawless with AI-powered tools like eye contact, studio voice, beauty filter, video mastering, and super resolution.
- Highlight: Surface key moments instantly with automated clips, highlight reels, chapters, and summaries — turning hours of content into digestible, usable assets.
- Amplify: Extend reach across audiences and channels with AI-generated social posts, blogs, emails, translations, and dubbing — without added cost or effort.
- Streamline: Automate compliance checks, simplify content search, and accelerate approvals with batch workflows that reduce risk and speed time-to-market.
“With the launch of CreatorSuite, we’re redefining what it means to create enterprise snackable video. It’s no longer about choosing between speed and quality, or scale and compliance. We’ve built a platform that empowers every team — from marketing to leadership — to show up with authenticity and scale their message, without the typical video production roadblocks. This is the future of enterprise video creation technology: fast, flexible, compliant, and built for the way people actually communicate today.”
David Moricca
Founder & CEO, Socialive
In addition to AISuite, Socialive is developing AI-powered translation capabilities, which will let you localize video content and ensure compliance for diverse global audiences in 75 languages, increasing reach.
About Socialive
Socialive is an AI-powered enterprise video creation platform for highly-regulated and global organizations that need to scale short-form and long-form video — fast, cost-effectively, and without sacrificing quality, control, or compliance.
Press Contact
Jennifer Burak
VP, Marketing, Socialive
Key takeaways:
- CreatorSuite brings speed, structure, and compliance to short-form video creation
- Anyone in the org can now easily contribute to and/or create a polished, brand-safe video at scale
- CreatorSuite marks Socialive’s biggest product development to date
Written by Socialive CEO & Founder, David Moricca
The fastest-growing content format in the enterprise? Snackable video.
In today’s attention economy, snackable video drives 2.5x more engagement, and videos under 60 seconds see completion rates as high as 81%. When paired with a clear call to action, these videos don’t just get watched, they get results: driving everything from job applications to demos, content downloads to event registrations.
We've seen how our phones and social media have had a profound impact on how we consume content. The way we engage with content for work is more reflective of how we engage during our free time.
And thanks to algorithm favoritism on platforms like LinkedIn, Instagram, and Google, short-form video gets up to 8X more reach and 2.5X more engagement than traditional branded content. It’s one of the smartest ways to earn the attention that you don't have to pay for. For enterprise teams, the question is no longer why short-form video — but how to scale it.
That's why we built CreatorSuite
With CreatorSuite, teams across your organization — Marketing, Leadership Communications, Field Sales, Employer Brand, and L&D — can source, guide, edit, and publish short-form video from trusted voices across your organization in minutes, not weeks. It’s the easiest way to unlock the power of people-powered video companywide, while staying on-brand with compliance.
Where we’ve been — and where we’re going
When we first launched Socialive, it was to make video creation easier and more accessible for enterprise teams. Over time, our platform became the go-to for remote recording, podcasts, livestreams, and webinars.
We saw huge adoption during that time in 2020 and 2021. That period forced our team to constantly keep an eye out for shifts in the world that we often can't plan for.
But the world has changed. Communication today is faster, more visual, and more human. Our customers want to put more real people in their video communications — from their executives, employees, and experts — and it has to be at a high level of quality that represents the brand. The resulting snackable video has to be authentic, fast, on-message, and scalable. Of course, this impactful video is part of a strategic push that convinces your audience to take the actions that move them down the funnel.
So, we listened — and built the solution.
Why we’re introducing CreatorSuite
Authentic short-form video is now essential to enterprise success. It drives reach, trust, and action — whether it’s an executive update, thought leadership post, employee spotlight, or field sales tip.
But creating it at scale? That’s been hard. Especially if you’re juggling:
- Busy contributors who are on the road
- Uncomfortable, camera-shy employees
- Brand and compliance risk across teams
- Manual workflows and content bottlenecks
CreatorSuite changes all that.
What is CreatorSuite?
CreatorSuite is your customizable toolbox for short-form video creation. It brings structure, guidance, and automation to every stage of the workflow — without requiring video expertise.
Key features include:
- Recording Booth: A self-guided recording environment that contributors can access anytime
- Recording Invites: Send invitations with prompts, scripts, and deadlines to collect content at scale
- Teleprompter: Keep contributors confident and on-message with on-screen script guidance
- Text-Based Editing and Subtitles: Edit videos and subtitles like a doc — just highlight, delete, or edit words
- Templates & Placeholders: Provide a structure for repeatable, on-brand content
- Projects & Approvals: Organize initiatives and move content from draft to publish, fast
All of it is wrapped in enterprise-grade guardrails for control and compliance.
What else makes up Socialive’s platform?
Including CreatorSuite, the Socialive platform is built on four integrated layers of enterprise value — working together to help you scale human-first video creation with speed, security, and strategic impact.
ProducerSuite – Produce like a pro, from anywhere
Produce high-quality livestreams, webinars, and podcasts right from your browser — without the need for a production crew. With powerful Studio and Green Room features, ProducerSuite puts your team in full control of every production, live or simulated live.
Studio features
- Run-of-Show: Plan and cue your segments with precision
- Brand Elements & Overlays: Add logos, lower-thirds, bumpers, and visuals
- Name Tags & Music: Personalize presenters and polish with audio
- Livestreaming & Multistreaming: Stream to one or multiple destinations simultaneously
- Producer Controls: New! Remotely manage guest devices for a smooth experience
Green Room features
- Team Chat: Stay in sync with behind-the-scenes messaging
- Teleprompter: Help guests stay on-script, even in live or pre-recorded segments
- Screenshare & Slideshare: Present content seamlessly
- Tech Check: New! Auto-test mic, camera, and connectivity
- Individual Recordings: Capture individual high-quality audio and video tracks
Enterprise Controls – Govern creation at scale
From permissions to compliance, Enterprise Controls give you the tools to scale video creation with confidence:
- SSO & Role-Based Permissions: Secure access for every user
- Spaces: Segment content by team, department, or initiative
- Audit Logs & Compliance Automation: Stay compliant and audit-ready
- Auto-Upload & Tagging: Streamline storage and discoverability
Integrations – From creation to distribution, seamlessly
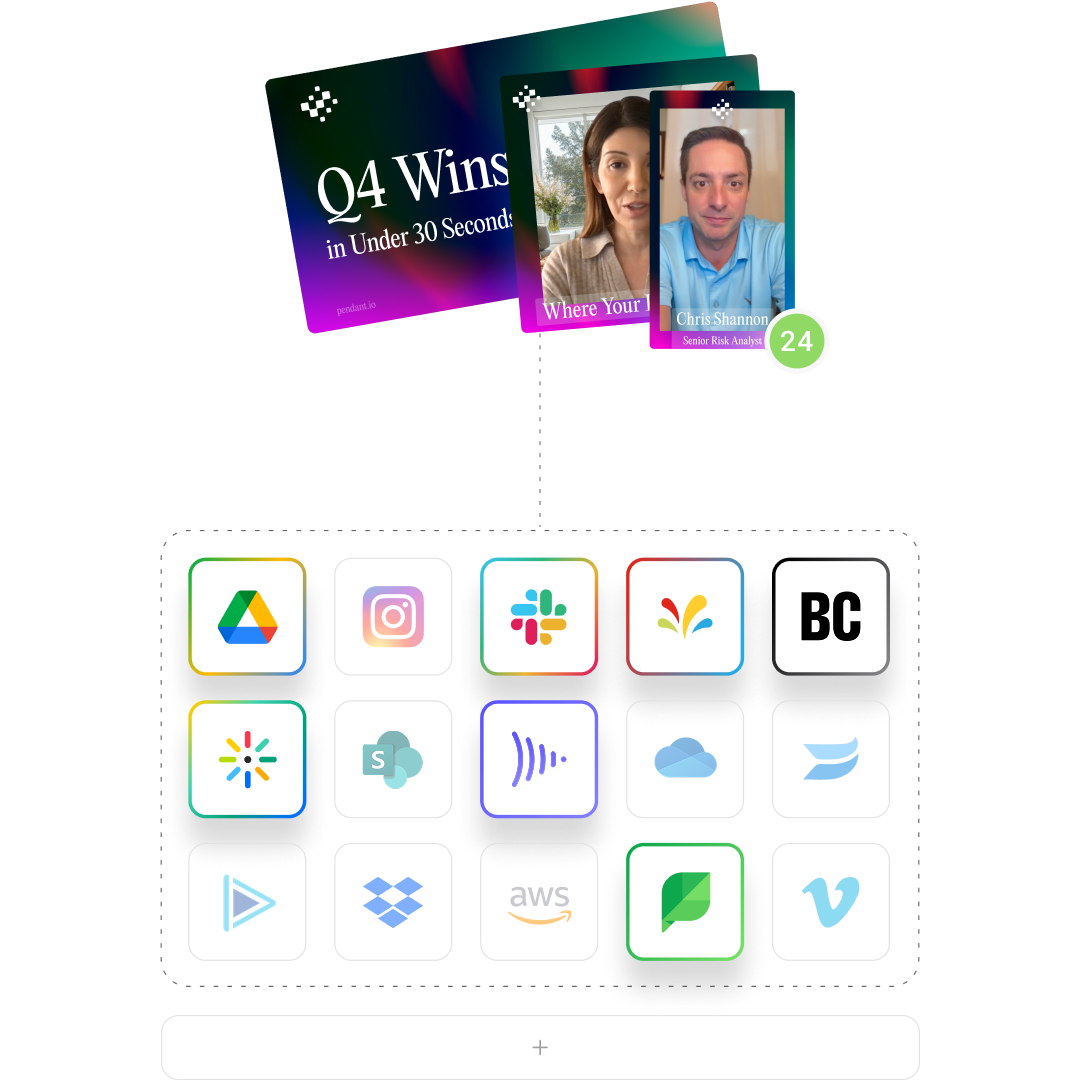
Push content directly into the platforms your teams already use. Socialive integrates across:
- Social & Marketing Platforms: LinkedIn, YouTube, Facebook, Instagram, Sprinklr, Sprout Social
- Video Hosting Platforms: Kaltura, Brightcove, Vimeo, Wistia, VBrick
- Collaboration Tools: Slack, SharePoint, Workplace
- Storage Solutions: Google Drive, OneDrive, Dropbox
AISuite (Coming Later in 2025) – Unlock more value from every video
AISuite, launching later in 2025, is Socialive’s new AI engine for unlocking more value from every video. Fully integrated with CreatorSuite for short-form video and ProducerSuite for long-form productions, AISuite enhances quality, surfaces key insights, amplifies reach, and streamlines workflows, helping enterprises deliver more high-quality, on-brand video at scale.
AISuite unlocks four key advantages:
- Enhance: Make every recording look and sound flawless with AI-powered tools like eye contact, studio voice, beauty filter, video mastering, and super resolution.
- Highlight: Surface key moments instantly with automated clips, highlight reels, chapters, and summaries — turning hours of content into digestible, usable assets.
- Amplify: Extend reach across audiences and channels with AI-generated social posts, blogs, emails, translations, and dubbing — without added cost or effort.
- Streamline: Automate compliance checks, simplify content search, and accelerate approvals with batch workflows that reduce risk and speed time-to-market.
In addition to AISuite, Socialive is developing AI-powered translation capabilities, which will let you localize video content and ensure compliance for diverse global audiences in 75 languages, increasing reach.
Welcome to the next era of Enterprise Video Creation
Socialive is the enterprise solution for modern video: fast, flexible, and built to meet the real demands of global organizations.
This is more than a product launch — it’s a vision for the future of enterprise communication: human-first, powered by AI, and ready for scale.
👉 Watch our “Snackable Success” Webinar: Webinar Replay
🎥 See the CreatorSuite in action with this 10-minute demo: Watch Demo
📰 Read our CreatorSuite press release: Read press release