
Key takeaways:
- Start by understanding the power of video
- Focus on your tech and your setup before creating
- It’s easy to record, edit, and publish in one workflow
One of the main reasons people don’t create as much video content as they like — is that they think it is too costly and time-consuming. But creating tons of snackable video content doesn’t have to be hard, and it’s well worth the effort.
A steady stream of video in social and communications channels is a huge value-add for businesses.
Over the past few months, I’ve spoken with our Socialive customers and pulled research to put together a guide for anyone just wading into short video creation.
Don’t worry, this info. is packaged into videos so you can watch along — it is the TL;DR, after all!
The type of video we will focus on in this guide is all authentic, snackable thought leadership in remote setups. We’ll show you how to transform your home office and laptop into a recording studio.
The power of short video is unmatched
Before we get to the practical creation tips, let’s start with the value of the short-form video content you’re going to create.
Companies of all sizes use snackable video for all kinds of communications, marketing, and learning purposes. Our Socialive customers all recognize that video allows them to differentiate their brand and stay ahead of the competition.
Zebra Technologies is a solid example of a business that focuses their video on external communications through their social media channels. They use video for product announcements, to drive attendance to their trade shows, to tell customer stories.
People just prefer video to other forms of media. Video marketing creates more leads, higher click-through rates, and higher conversion rates. Social engagement jumps through the roof when you use video content.
If you’re not using video across channels, you risk going the way of the dinosaur.
Video trend: micro-videos and snackable content dominate
The first thing you need to know about video is to be concise. Yes, a lengthy guide (like this) is handy when you need it — but the ideal video should nail a topic in a short timeframe.
We’ve seen the success of TikTok from its short-form content, and other platforms are working in snackable formats. For example, Instagram Reels pick up 22% more engagement than other Instagram posts.
Aim for about a 1-to-2-minute video. Anything longer than that is best served as a deep dive or explainer video. Be sure to call it out in your title and with your intro that you’re here to give a few quick tips — or that you’re going further in-depth on a topic.
Mobile video trend: consider vertical videos (9:16 portrait)
Part of creating for social media includes baking in a mobile-first approach. Creating for mobile is nothing new. Google has prioritized mobile indexing since 2016. It’s all about designing content for the devices most people use — our phones. We do everything on our phones now, from reading articles to buying plane tickets, so of course we need to have mobile in mind.
It’s always good to at least consider, if not to create content in 9:16, portrait format. That vertical orientation makes the most of the entire space on mobile screens.
The last thing you want is for your widescreen content to get cut off because you didn’t record in 9:16 and never planned for it to be edited into a vertical video.
Always provide captions on your content
Verizon Media reported years ago that 92% of people watch video without sound.
Think about it, how often do you find yourself scrolling through a social media timeline and quickly peek at a video before continuing to scroll? Captions help tell the story, even if the viewer has the volume off. If it’s great content, captions give people a reason to stop and unmute your video.
Captions also make your content more accessible. Closed captions make it easier for those who are deaf or hard of hearing to understand your content.
So, be sure to include a caption file whenever you put together a video package, and consider burning captions into the video file itself.
The importance of video SEO (and how to do it)
Video SEO actually isn’t as hard as it might sound. Think of video SEO less as something magical and more as a checklist you need to address when publishing a video.
- Create helpful, meaningful content that your audience wants
- Leverage fresh perspectives and speak to your brand’s authority. Follow Google’s “E-E-A-T” recommendation and create reliable, people-first content.
- Pick a relevant, punchy title that’s descriptive and easy to understand
- The title will largely determine whether or not your audience is going to watch. There’s a reason why YouTubers change their video titles and video thumbnails so often!
- Include a thoughtful description and video chapters
- Take your time and write up a succinct summary of the video. Be sure to put timecodes at the bottom of the video description so viewers can easily navigate through sections of the video — sites like YouTube will automatically break the video into chapters.
- Here’s an example of how you can write the timecodes:
- 00:00 - 00:05 Intro
- 00:05 - 00:30 Main topic
- 00:30 - 00:45 Secondary points
- 00:45 - 00:50 Outro
It goes without saying, but quality over quantity. Always. Rather than regurgitating old information or spamming the universe with meaningless content, focus on keeping it fresh and trying to help someone with your content!
Run a tech check before recording
Preparation will save you so many headaches. Always plan out your content and your talent’s setup before hitting “record.”
This may seem small, but it will go a long way to getting the most of your recording session. Always have a quick reference guide handy.
Focus on your framing
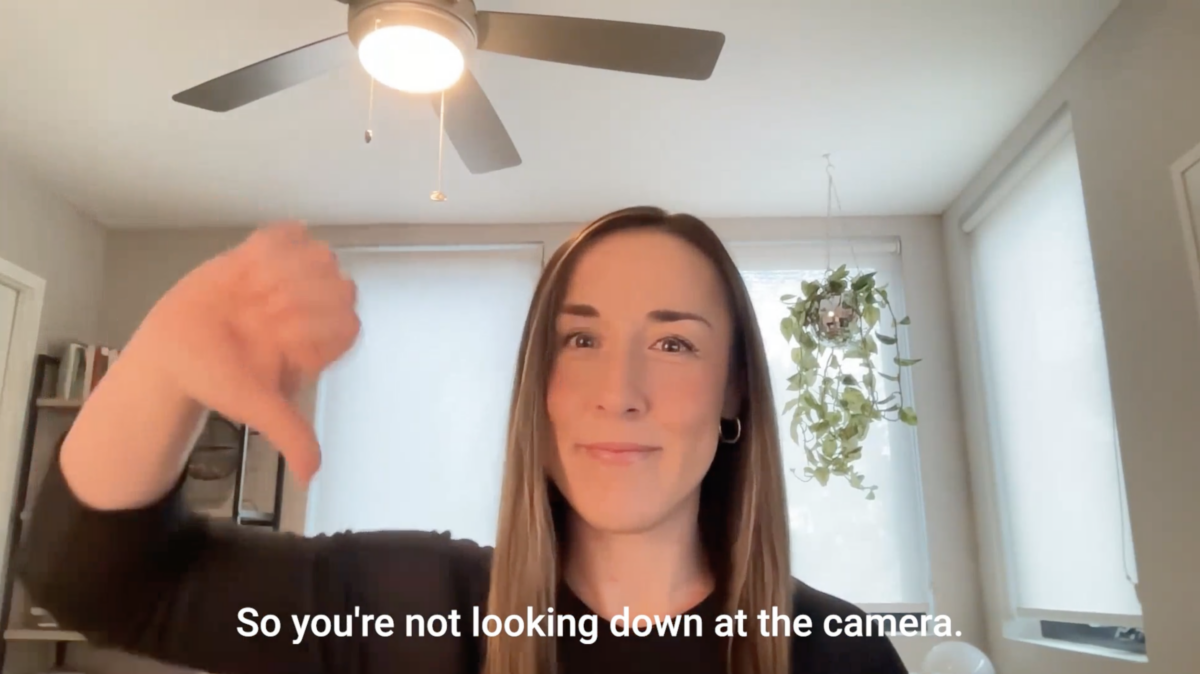
Think in three dimensions when setting up your shot. Your camera should be at eye level or just above your eye line so you can look into the camera. You are speaking directly to your audience, after all.
Try to stay centered in your shot or just off-center. Keep your head and torso in the shot, with enough space above your head to the edge of the screen. You don’t want to appear just as a floating head!
If you’re using your laptop camera, try propping it up on some books. Position external cameras like DSLRs above your laptop so you can reference your screen and still keep your eyes on the prize.
Find great lighting
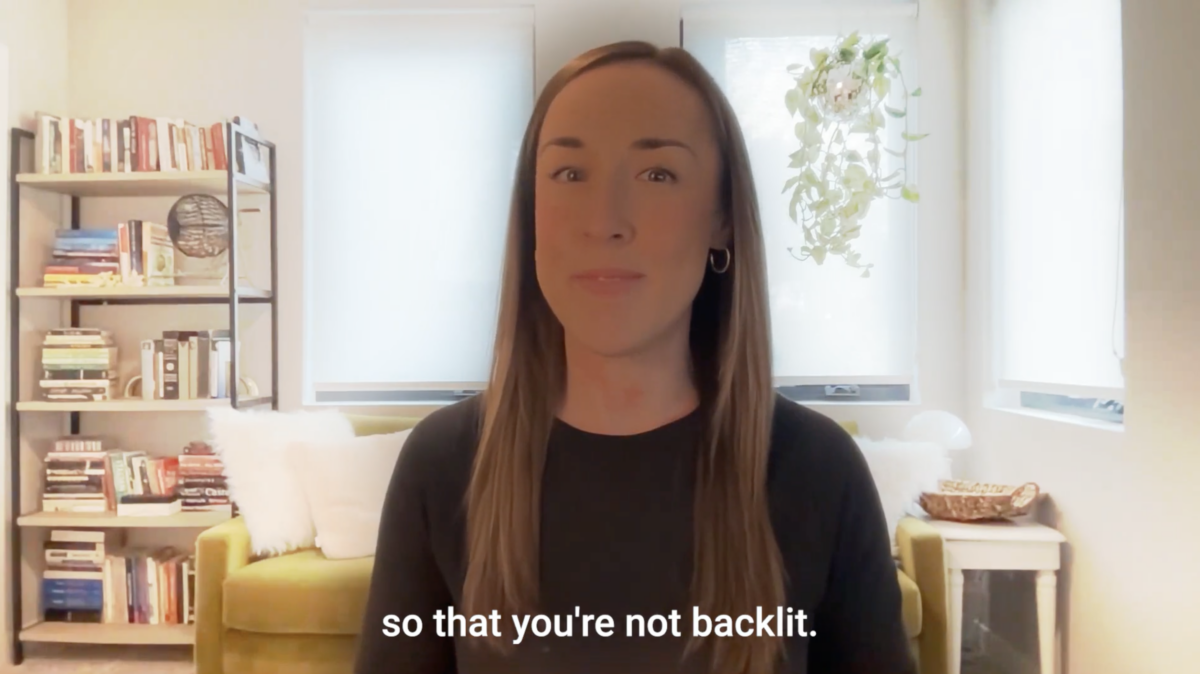
Get as much lighting into your space as possible. There’s a reason why Hollywood sets, and studios have all that extra lighting around!
Even an average camera can make you look great if the lighting is good. The strongest light source should ALWAYS be in front of you, not behind you — unless you want a stylish silhouette shot.
Do your best to find soft lighting, like a desk lamp or natural lighting, to avoid creating harsh shadows. You might have to play around with your setup to get it just right.
Experiment with cameras and microphones
As I mentioned earlier, you don’t always need the latest and greatest equipment. Newer laptops have solid webcams. And don’t forget — your smartphone has one of the best cameras you can find.
But for any other external hardware, like a DSLR camera or desktop microphone, you can easily set them up as device inputs for your recording session.
Here are some of our recommendations for a desktop setup ($50-$250):
- Any kind of USB camera should do well, especially if it doesn’t need a separate power source
- Tripods are an easy way to make the shot look nice and level
- Lapel microphones and desktop mics will cut down on the echoey, distant sound and get you closer to podcast quality
- Headphones and headsets are usually a great idea to cut down on audio feedback and are usually necessary when using external microphones
- An audio mixer might not always be necessary, but you’ll need it for a lapel mic or other XLR mic — this way, you can easily connect multiple mics in the same room
Check out our support guide for a full overview of compatible devices. We name names and have some specific brands you can choose from there.
Recording best practices
When it comes to the actual recording, you should approach it similarly, whether you’re the talent or if you’re guiding someone else. Feel free to dive deeper into our guide on making thought leaders comfortable on camera if you need a bit more information.
Here are some quick tips for both talent and producers.
Recording yourself as on-camera talent
Once the tech check is out of the way, focus on your surroundings. Make sure you have a quiet(ish) environment with few distractions behind you. When in doubt, blur it out!
Your confidence is the most important piece of the puzzle. You should practice what you want to say before going on camera. Rehearse and breathe through any nerves. Remember that mistakes are OK and totally natural — that’s what makes us human.
Just remember that no matter if you choose to use a teleprompter or go from notes, you want to sound confident and natural, not like you’re reading. Plus, you’ll always get better with practice.
You’ve got this!
Recording others as a producer
Now for perhaps the toughest challenge when creating content — convincing and guiding others. I’m usually on the talent end of this exchange, but a lot of the same things apply to producers.
Run through your tech check. Calm your talent if they’re nervous. Help guide them during the recording session.
But the best thing you can do as a producer is to be prepared. Never let your talent show up without the messaging, an outline, and the final video already determined.
Your goal is to make it a light lift so they can just show up and focus on nailing what they want to say.
Here are some steps to take ahead of the recording session:
- Determine your topic and map out the final content
- Meet with your talent before the recording in an intake session to get their opinions and feedback on the topic
- Build their notes into an outline or script
- Provide a cheat sheet with preferred setup and equipment
- Schedule a practice session ahead of the actual recording
- If working with multiple speakers, be sure to follow these steps with everyone and ensure their visuals and audio are all consistent
You’re the expert in the room! It might seem intimidating to give constructive feedback to your VIP talent, but be confident and direct, and they’ll follow your lead.
Yes, they are busy, so asking for another take might feel uncomfortable. But remember, they made time for this recording and are highly motivated to look and sound their best.
Check out a few more of our tips on how to prep thought leaders for a recording session.
Putting it all together: record, edit, and publish your content
Aiming for a short-form video with social media in mind is always a great starting point when you plan your video. Pick a place that gives you some peace and quiet, make sure your equipment is working, get into frame, and you’re ready to record.
Now that you know the basics, the next step is to move on to editing and then publishing your content! Of course, don’t forget those video SEO best practices we went over once you’re ready to publish.
Here’s a post that can help you familiarize yourself with the editing process. In full transparency, I’m not a professional video editor, but I can tell you that organizing and planning your edits makes it a lot easier to get started.
Of course, we want you to use Socialive, but this workflow holds as the best way to create content — so long as your platform can keep up.